Wednesday, December 22, 2010

Screw art


Here are the three screws that held the stator plate in, I replaced them and the washers with new ones. I threw them in the bin right after I took this awesome arty farty photo of them.
I got my socket adapter for my torque wrench and put the whole thing back together. wheeled it out into the sunshine and kicked her over, a nice smooth idle ensued and I threw on my helmet and went for a ride around the block a couple of times, the engine felt MUCH better, more responsive and the power had improved too, So I smiled and patted myself on the back as I parked up, an office lunch meant that it wasn't a good idea to ride very far, so I tidied up the workbench and put everything away and back into the glove box ready for a bit of a ride tomorrow after I get the day before Christmas chores done, mow the lawn, get any last minute supplies, The boys are in daycare so I will be left to my own devices.....
This blog has ticked over the 1000 hits mark with people from every continent having a look, over half are from Australia, a quarter from the US and the UK making up the best part of whats left, the rest are from everywhere Chile, Slovenia, Pakistan, South Africa, Scandinavia, all over SE Asia and Europe, Canada.
I have received Private offers of help and some very useful advice from people...Thank you to those guys for your time and interest to help out a novice scooter mechanic and budding enthusiast. I enjoy learning about the workings of the scooter and love riding it even more, I am now much more aware of what I need to keep an eye on while still enjoying the freedom and the joy of owning a classic scooter, even if it is of dubious origin.
I will be quiet for a couple of weeks, Christmas and holidays interstate you know the deal, the bike will be parked up for most of that time. Merry Christmas and a safe and happy new year.

State of the Stator Plate


Now I dont really know what all this is supposed to look like, but it isn't new, and some of the soldering was a bit sloppy, one dob had fallen off and was sitting in the bottom of the casing. I marked on the casing and the edge of the stator plate and casing how far I needed to move it, the three holding screws were worn from a lot of use, they all had washers and spring washers, I moved the plate to where it should be, cleaned it out and after cleaning up the key, shaft and flywheel put them all back together, this is when I realise that the torque wrench doesn't fit any of my sockets, so I'll go to the hardware store AGAIN and get the adapter. This afternoon after work I will put it all back together and give it a kick and see how it goes.

Flywheel off


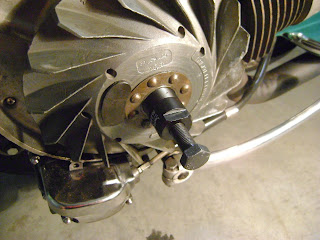
I use my new impact wrench to get the flywheel nut off, easy peasy. You can see the condition of it and the lock washer.
I give the flywheel threads a clean and screw in the removal tool, it goes in nicely a good 5-6 turns. I then hold it and turn it and the flywheel comes off a lot easier than I thought it would, and it was a lot heavier than I thought it would be, it was in reasonable condition, not perfect by any means but it looked alright to me.
The woodruff key was a little worn with a small line on both sides.
All the pics are pretty straight forward.

Compression & timing.


I was told there was three main possible reasons I was losing power and also having a sooty plug, compression, timing & points gap.
I confirmed the gap was within spec. I established TDC and 22 degrees and found the firing point was about 3-4mm out, so next was to make sure my compression was good.
It seems I have given either the hardware store and auto parts stores a visit each day this week....timing light, impact wrench, compression gauge, socket fitting for impact wrench, different spark plugs.......
So I hook up the gauge and give it 4 kicks to get it to 120psi, which is what is recommended, now I think I have to do it on a warm engine too, but that will have to wait because I need another ferking socket fitting for my torque wrench to get the flywheel back on. More on the flywheel later.
Pic. one. 120psi four kicks on a cold engine.
Pic. two. the gauge hooked up.
Pic. Three. My markings for the timing, when I did it the first time I used a felt tip pen, not a scribe, so I re-did it, there is a scribe mark down on the inside of the flywheel that you cant see in this photo.
Pic. four. I need a bigger bench.

Sunday, December 19, 2010

Front end surprise


Because of the weather I was unable to go riding, I did manage a few short runs after I set the cab, some good, some short and spluttery, I ended up resetting it all twice as I must have had something wrong because I got to the point where the run was just backfiring, sputtering and dying, not at all good. I still have the lake of higher speed power and acceleration after 80kms per hour (approx. 50mph)which i'm told is a classic symptom of timing, I had a chat with a local sparky about the little light circuit shown in the points timing section of Scooterhelp.com and he seemed to think I didn't need the battery holder but sold me the clips, some wire and a light. needless to say I couldn't get the circuit working, well it worked but it didnt cut out when the points seperated like it should, no matter where I clipped them, so I will be going back to see him today. To the naked eye the points open at around the right spot, but I need to be sure. I can't get my hands on a timing light without ordering and waiting, and this close to Christmas it could take weeks.
Anyway I was just having a really good look over the whole bike, at the welded ptsches mainly and everywhere else I could get to without pulling too much apart, I noticed the two grease nipples on the front suspension arms were painted over, I scraped the paint away to check if the nipples were still working, i.e. that the little retaining ball still moved in and sprung out, they did, but I thought I'd just change them, What I found in the first one was a little disturbing, the grease was thick, and I mean hard to spread thick, BUT it was riddled with tiny shards of what looked like brass, now I have no idea what it could be that was in there nor how it ended up in pieces...fark sake.
The other one, the higher up one was fine, fresh grease and all, I replaced both nipples and new grease. I pulled the shiny cover off the arm and had a look in there it all looked ok, I did notice also that the front shock lower rubber looked like it was worn and in need of replacing, but the whole connection looked out of square to me, see bottom photo, It may be that this is how it sits, I don't know.
Pic. one. Grease with the brass shards through it, and the old nipples.
Pic. two. New nipples in place
Pic. three. Inside the arm cover.
Pic. four. Top view of the lower shock connection, does this look like it should???
I rode the GT into work today, weather mainly but I want to take the Sprint for a good run without having to be somewhere on time, just in case. She has 1600 kms on the clock.

good, bad, ugly, not in that order.

With interest from a few quarters, positive and negative, and an experienced eye or two, a week can change everything.
I bought a scoot from Vietnam, I knew the history, the horror stories. I took a gamble and as they say "buyer beware". I now have a scooter that I absolutley love riding, she goes ok, no problems, not big ones at this stage.
Every little twist and turn opens up a new WTF.
From good advice, I sort of waded into the deep end and  attempted to start from scratch. I re-set the carb, established the TDC (top dead centre) of the piston, checked the points gap and half arsed checked the timing, more on that later.


Pic one. The carby, a new, I think, Spaco dellorto 20/20. we are still getting to know each other.
Pic two. a down loaded timing disk in place, a wire marker, probably not so clear, but essential in the process.
Pic three. My badly constructed TDC tool, and disk. I took the busted bum spark plug that came with the scoot and twisted and broke the spark gap thingy off, smashed the ceramic insulation bit off with a hammer and pulled out the electrode, this was all with guidance from a well known scooter website, I then bastardised it with a blue plastic plug, super glue and a long screw. Not pretty but functional.
All said and done, the TDC and the spark timing, was, from a naked eye point of view, close. I will need to either employ the local bike shop or bluff my way through the whole timing light thing
I checked the points gap and was happy, the tolerance should be .3-.5mm, It was over .3 but the.38  just squeezed through, so I think thats ok.
I enjoyed doing this,  I love the "what is the next twist and turn going to present" factor,I'm aware of the possibles, and will deal with them as they present themselves.

Welds of concern


The welds that were blurred out of the original photos, fairly obvious, which is why they were probably blurred out in the first place... No comment really.

Wednesday, December 15, 2010

Frame Pictures


I have posted these in response to a request from Ulysses, I hope they are clear enough, I have enlarged the Asian characters so he can see if they match some asian bikes or engines that he has in his workshop. If in fact this casing was made in Indonesia, as it appears may be the case, I'm glad that I found out so I can document it as part of a true history of the scoot. His concerns of the welded patching, quite rightly, should be looked into, the last thing I want is the frame to fold in half doing 75kms an hour,So I hope this helps.
I will be doing some reading up on adjusting the timing and point gapping before I tackle the job of checking it is/was done correctly.
If Ulysses would like to contact me personally     badrever71@yahoo.com.au
Any information or communication will be treated as private, although I will share relevant stuff on the bike and what I do in the blog.

Tuesday, December 14, 2010

In response to Ulysses' comments

Mr Ulysses thank you for your strong comments, the reason I bring attention to my blog about this bike is because I am not experienced enough in mechanical things, nor old scooters. I was hoping (and expecting) for somone to bring things to my attention, you, my friend, are the first person in nearly 800 hits to do so. I will be taking your advice for sure and lifting the mat when I get home to check for the weld marks you mentioned, I have sought advice from someone more experienced than me regarding the carb, and I will be looking into the timing as well, I believe the compression is good. I can also see your point about the bulbs, how about I just figure out whats wrong and just fix it....no mention of bulbs again, I can imagine how annoying to someone who obviously does a lot of work on these machines it would be. Apologies.
As for the welded patches, I saw them in the pictures, but what I didn't see was the welds that were "blurred out" and I dont know what the frame is supposed to look like I am always looking at everything I can to see if something is not right or for new things that weren't there a week ago. This is why I started this blog, so people can chime in and point me in the right direction.
Finally, I was under no illusions that I would get or have got the ONE bike from vietnam that was a good one. I did a ton of reading and research and against my better judgement took a gamble, a risk knowing that I might get, and may have, a piece of shit. My thoughts were that at best I will have a bike that runs well and if it breaks down I'll attempt to fix it, rebuild it if I had too, and worst case well short of killing myself I'd have a pretty fancy paper weight, seriously I thank you for your input and I will be listening to you or anyone else that offers me advice, I try to stay positve when I find something that even I know isn't quite right and I'm sharing it  for people who might be interested. and I think it's obvious I really love riding the scooter.
Mr Ulysses thank you again for taking the time to comment.
Brett

I think I've got it.


Well once I got home and all the domestics out of the way, I pulled the plug to check out if the black had lightened to a brown. It hadn't so I gave the mix screw another increment clockwise, total 1/4 turn from where it had originally been set at, the plug was lightly covered in black powdery soot so I cleaned it up and put it back. When I adjusted the screw, it had a film of fuel/oil/crud on and around it so I cleaned it up and I suspect I may have a small fuel leak, I thoroughly cleaned everywhere I could get without pulling stuff apart, except the air cleaner cover. I rode it to work this morning and just tweaked the idle screw once she was all warm, I am happy now that I have the mix right and the exhaust is definitely the right shade of blue, one more plug check when I get home and that should do it. Now I will keep an eye on a possible fuel leak.
I had noticed this before but thought I'd post a pic anyway.
Pic one. the workshop.
Pic two. some chinese or japanese writing?? not sure why they would be here on an "original" italian engine casing, this may or may not be the real deal I will have to do some research or ask someone.
Pic three. the pic isn't that clear but it looks like someone has taked to the casing in the selector box area with a heavy duty buffer or a grinder to "tidy it up a bit, I guess this part of the bike is quite susceptible to damage and in the 39 years it lived in Vietnam, I'd be surprised if it didn't cop a knock or two.
I will put an order in for some things I'm going to need to get the tank and petcock (gotta love that name) out if I need to, a few gaskets and some spares, just in case.

Monday, December 13, 2010

1500kms

I ticked over 1500 kms on the long way into work this morning, I took the long way home yesterday so the engine would be warm when I adjusted the carb and idle, I did some reading yesterday and learnt that its better to tinker with a running warm engine, if turning the fuel/air mix screw you also need to adjust the idle as well. It ran well this morning, no sputters or complaints, the spark plug was still black and sooty, so I might give it another little turn  and see, the exhaust is still dark also.
Thinking about the sputter, I was thinking that when I filled the tank I filled it pretty much right up allowing only enough room for the oil, this may have effected the breather in the tank as the fuel sloshed around whislt riding along. could this be the cause?? now that I have used more fuel it hasn't happened.
My globe blowing has continued, another tail light and the speedo light as well, I haven't had a look at that one yet but I think it should be an easy fix, providing I have the right replacement globe.

Sunday, December 12, 2010

Post ride inspection


So I din't really know what I was looking for but I did the usual stuff, pulled and cleaned the plug, it was still dry black and sooty, I had actually only turned the screw 1/8th of a turn as I believed that this was a delicate adjustment so I gave it another 1/16th and will see how it goes.
There was oil on the screw, as you can see on pic two, this was obviously from the oil leak I had, which hasn't leaked since I fixed it, which is nice, and also oil on the frame above too, I cleaned it up as best I could, I pulled the air filter box cover off and had a look, everything looked ok, see pic one, all clean and new, except the choke wire was just that, wire and it was just threaded through and wound around its connection point to the carb. and it was rusty. This was the start of the new to do list, replace the choke wire and the actual air cleaner I will pull off and clean, probably replace it too depending on how it looks.
Pic three and four are the muffler with the nice shiny new paint, peeling away I know this is going to happen and will need to be cleaned up and repainted regluarly, the quality and the thickness is a bit sus to me. The connection point to the cylnder has seen better days and i have to get onto the surface rust on the cylinder cooling fins too which I plan to do as per haynes service schedule, when I de-coke the piston head. I have decided to just replace things as the break, fall off, or just look dodgy, like the rims. I have already started a new parts list for my next order.
One thing I noticed before I left on the sunday run that I forgot to mention, was that the rubber seal around the fuel tank was stained and appeared to be damaged from fuel, some of which had just leaked out when she was on her side getting the o-ring sorted, but I keep it clean when i fill up and there is always a little bit of fuel on there which probably, maybe, gets out through the cap or the rubber seal by me not tightening it up enough, but it might be the top of the tank? there isnt ever any fuel spots or a strong smell in the garage so I could probably rule that out, unless that was what the oily stuff in pic two is. Keep an eye on that too.
The ride into work today was ok, she only gave a small sputtering complaint when I hit a hill going into town, just once and that was it. see how she goes on the way home, the hill is much bigger.

Sunday ride not what I expected.

Well I kicked Gloria over yesterday and let her idle while I got sorted and got the gear on, my plan was to do my loop out the back of Lindenow and through town and fuel up head to Paynesville for a coffee at Ians cafe, back into town pick up a BBQ chook and some chips for a lazy Sunday lunch, total kms approx. 75, I had given the air/fuel screw a 1/8th turn (clockwise) to lean up the mix a bit, I think thats right, cleaned the plug so I could check it when I got home. This would give it a chance to see how it ran.
The first part of the plan went fine

This is one of the bigger hills I encounter on the back road to Lindenow, I was over taken by a cyclist in this when I was stopped taking this pic. I got him going up the otherside of this valley, I'm sure he didn't appreciate my 2T exhaust fumes as he was struggling for air on his incline attack.
The scoot ran well on this leg of the trip once the hilly parts over you hit the river flats for the return trip, passing through the vege fields and dairy grazing paddocks, so the senses are awakened by the freash smell of cabbage and cauliflower and cowshit all in one, mmmm nice. last time I came this way all the workers were picking the veges and all of them were asians wearing the typical conical hats, I was transported back to my cycling trip in SE Asia and Gloria got nervous thinking I was going to load her up with a 2 tonne trailer to tow into market...most of them waved, I tooted back. I got into town and stopped to fill up. while I was putting in my oil a guy wandered over and we had a quick chat about the bike, turns out he had and old indian from the 30's he had restored and it too had a top speed on the highway of about 80kms too, not that good for a 600CC but he didn't care, he reckons the brakes wouldn't stop him if he went any faster.
It was the local Christmas toy run so there was a lot of bikes in town all fuelling up and coffee top ups before they run, I got a few nodds and a wave or two as I putted past the groups on my way to Paynesville, now I knew the run was on but the route they are taking has some massive long high roads and to be honest I didn't think that the Spring V could handle them just yet, next year she will.
Paynesville is about 25kms from Bairnsdale, I had gotton about half way and the engine started to sputter a bit, I continued for a bit and she did it again, my first thought was that she was fine until I filled up and I was on a dead flat road. Could it be my air/fuel adjustment? I pulled over and gave her an utimatum, are you going to burp and fart and die or make it? She was idling just a bit faster that she normally does, but I hadn't touched the idle screw, but in saying that it was a good steady idle. I decided to abort the paynesville leg and head back into town, if I was going to be pushing her home it was going to be from in town, 3 kms from home and not 15. She sputtered a little bit more, not a backfire type but more a bogging loss of power sputter and only two or three and shed go ok, once in town I thought I'd give her a bit of a workout through the gears and revs and see what happened, it happened a few times but otherwise ran fine, I pushed her a bit harder that I normally do and she passed the test, It's something I will be keeping an eye on.
I added another 25 kms, meaning I could've made the cafe and back, stopped for the chook and headed home for some investigating after lunch.
NOTE. if anyone has any comments or ideas please chime in, I think I'm just being a bit over cautious.


Saturday, December 11, 2010

young fella

Just pottering about today, my oldest, Angus 3 & a bit yrs old, finally showed some interest in the new green thingy in the garage, which reminds me I must go and check the fuel tap is still off and the random sharp steel thing he was playing with and dropped didn't do too much damage to the floor.
The plan is to put 50 or so kms on tomorrow, seeing how the small tweak to the carb goes, also go and see old mate Ian at the Cafe in Paynesville to give him a little poster I have conjured up to put with all the other old Vespa and Lambretta posters he has, pics to come, to invite any local or visiting scooterists for a coffee at Ians cafe, Harbourside cafe, Paynesville, Victoria, a chance to increase your carbon footprint, burn some 2T or whatever, head out on a ride somewhere and sample some of the fine riding that Eastern Victoria has to offer.......or something like that anyway.

Friday, December 10, 2010

Patch me up


Pic one. six o'clock patch, been there a while by the look of it.
Pic two. twelve o' clock patch, same deal, both pin hole punctures.
Pic three. the nice new shiny wheel nuts, I now have plenty of them, and a crap load of shitty washers, disturbingly not a spring washer in sight.

Quality stuff


So I pulled apart the other two rims. I can't say I was surprised after the first rim but at least the tube in the first one was ok, some surface rust stains from the dying rim but ok, rim #2 wasn't that flash either, also rusted and warped, but it was when I pulled out the tube that it got interesting. I found a double patch job that was obviously done a while ago, I knew as soon as I got the bike that the tubes were old, you could tell from the valve,  so I thought I'd have a look at the inside of the tube since I was going to chuck it out anyway...FFS there were two gashes, not holes, one was 20mm long the other 15mm, I believe that this is called a snakebite puncture, bloody big snakes in Vietnam apparently. I mentioned ages ago that there was something rattling around in the tube, well Pic two shows what it was, I wasn't really sure what it was but it was sort of gravelly & powdery, maybe old dried up glue from the two massive patches that fell through the cravasses in the tube, or dirt, or granulated dried up Nuoc Mam Cham.....
Rim #3 was actually ok I'd re-use it in a pinch. but again the tube was buggered, a patch on opposite ends of the tube, further investigation found pin holes, you get that.
Pic one. The double patch job.
Pic two. The whatever it was rolling around inside the tube.
Pic three. The snake bite puncture from hell, why bother fixing it??
Pic four. The second rim, actually bolted back together, some of the gaps are 4-5 mm, not to mention the rust. Mind you they look nice on the outside.......

Sunday, December 5, 2010

Carb tuning.

I took G out for a run today as I was home alone and need supplies for dinner, I naturally took the long way, approx. 40 kms to do a 5 km trip, She ran well but I'm getting a little concerned about the lack of and rapid drop of power when I hit a hill, as mentioned before, even if i'm steaming at 80kms when I hit its a drop that is quick and before I know it I'm contemplating a downshift to third at 55 kms. don't really know what to do short of avoiding hills, which is near impossible, although the hills i'm talking about are pretty big, next time I ride out the long way I will take a pic or two.
Anyhoo, I love the attention the bike gets in town, mostly older blokes doing a double take wtf type of thing, I don't have girls trying to get on the back at the lights, shame, but I get the odd look from the ladies too, now I know for a fact that they are not looking at me, but the plume of 2T in injecting into the atmosphere, well maybe but Gloria is a people bike and I have had waves, toots, thumbs up and people come up for a chat that wouldn't normally give me the time of day, unless I asked of course, today at an intersection I had a lady give the thumbs up and I heard her say nice scooter as she drove past, last week I was parked at a local supermarket and an older gent with his wife stopped and began to tell me how he had a 1958 Vespa he did something like 50,000 miles on, he had a tear in his eye and he couldn't say enough good things about the scoot, I was filling up last week and a really old, probably too old to drive, guy in his flash 4wd and caravan, was filling up too, he finished, hobbled over and just stood there, a bit shaky, looked me in the eye after taking in the Sprint V for about a minute, and said " I haven't seen one of them in a while" and toddled off, funny stuff, On my ride to work I go through a couple of school zones, plenty of kids about, they all turn around when I'm at least 200 metres behind them, and smile and wave as I pass, toot toot as I go by, I'd probably turn around too if I heard a chainsaw coming down the road. The crossing lollypop man at one of the schools always waves me through and gives me a big smile and a wave, I reckon he likes the smell of two stroke. I must stop one day and say g'day.
Well back to the point, my previous post showing the spark plug black as the ace of spades, according to the Haynes manual I or should I say Gloria has carbon fouling, the exhaust is dark to black, not the light blue it should be, so I need to do a quick scrub up on adjusting the air/fuel ratio through the carby and get this sorted. Put that on the list too.

Sorted for now.

I spent a good few hours with Gloria yesterday and got everything done that I wanted to.
I built and relaced two new wheels, replaced the blown headlight and tail light globes, fixed the headlight so it wouldn't rotate, time will tell on that one, replaced the o ring and hopefully stopped the oil leak, swapped out the spark plug, cleaned up the old one and tossed it in the left cowl as a spare, replaced the cylinder cowl and gave her a good tidy up underneath.
On Friday I rode her to work, as normal on a nice day, and she ran fine, I topped up the tank on the way, and lowered the oil ratio to approx. 2.5%, Friday is childcare day so if my wife has an early shift at the hospital I bundle the boys in the car and drop her off at 7am and drop the boys off on my way to work, picking the wife up at 330pm and riding back to finish work, If she works an afternoon shift, I ride to work as normal, she drops them off and fills the time until I ride home and drive her to work, picking up the boys when I finish and luckily she gets a ride home from one of her lovely workmates in the evening. So I get down to the bike for the ride home and she kicks over but won't idle, I begin to panic a bit as this will throw a massive spanner in the military operation that is daycare day. Luckily a guy who works for the architect next door to my office, I'm a draftsman for a structural engineer, He is a motorbike guy who has shown a lot of interest and admiration for the Sprint V, wanders past. "what's the problem?" "don't know she was running fine 2 hours ago." "out of fuel?" "nope filled her up this morning, can you hold this?" refering to the throttle "sure" so he held the throttle slightly cracked, while I put my jacket and helmet on "cheers" I say as I get on, I let the throttle go and she dies again "crap" I actually said fuck but this is a family blog, so I got off put her up on the stand and kicked her over again this time giving her a bit of throttle, said thanks again and rode home, breathing a sigh of relief as I rolled into the driveway right on time.
After I finished all the work I kicked her over and decided to go for a little run to the servo to double check to tyre pressure, she started fine and idled perfectly, ran really well on the road and when I got back I dumped the oil, it has been around 800kms since I last changed it, it was the usual bluey grey metallic colour, the same as it was last time, and there were still some tiny flecks of metal in there, nothing to be concerned about though, I squirted a few extra squirts in to rinse the leftovers out and topped her up, good as gold.
I've noticed that now i'm running higher revs the gear changes are more of a click than a clunk and are a loy smoother, 0-20 first, 20-40 second, 40-60 third then fourth, shes not a fan of hills even with high revs at 80 she dropps rapidly to 60 and less if its a long hill, I'm assuming this is normal and may improve with a few more kms under her belt, but I'd soon crack the shits dragging my fat arse up a hill too. and the high beam element of my headlight blew again.........grrrrrrrr, start the next list.


Pic one. The new tyre tread of the Michelin S1 tyres, not exactly the classic look but I don't mind.
Pic two. the side view.
Pic three & four. the new cylinder cowl in position, it's not as shiny as the old one, but still looks good.