Sunday, February 26, 2012

Stand out.


I decided to give the centre stand an overhaul, the typical practice of double nutting and using a dozen crappy washers was what I found.The bolts were 15mm longer than they needed to be and on the top side had two or three fibre washers, for what reason I don't have a clue and it looked like they had put the stand on while the paint was still wet because the area around the holes were kind of cratered up from the hole to the top of the paint. Quality.
I had the scooter up on some timber so I could get the stand off when disaster struck, I blew a thong, my favorite pair of Havaianas, and perfect workshop footwear...gone, lucky I had a pair of double pluggers on standby.

Tuesday, February 21, 2012

The turning point.


I got my large circlip pliers in today and got the last of the engine apart, now I turn around and begin the rebuilding process, I am looking forward to the challenge, I have a bench full of dismantled parts, screws, bolts and in hindsight should've probably been a bit more meticulous, I do have a lot of photos to look back on though, I have a decent list of parts to order in and over the next couple of weeks will collect them and get this show back on the road.
Pics are the inside of the clutch cover, the clutch vent and the clutch arm and the bottom is the main bearing, clutch side, the two retaining circlips and the seal, which was stuffed, I'm surprised it still did half of what it was supposed to do, the reason I'm guessing is that there was a circular gasket behind it, not sure its meant to be there but it was falling apart and there were shards of it all over the place in there, I couldn't really see what it was but I'm fairly sure it was a paper gasket material.
I have decided to also replace the centre stand fixings as well, mainly to give me something to fix while I wait for parts to arrive. My flyside case should be here soon too.

Wednesday, February 15, 2012

Getting to the bottom of it.


First up is the mainshaft bearing housing.
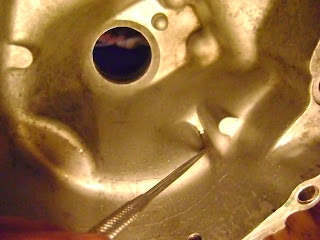
The inside of the case, the scribe points to the area that was chock full of grit and crud.
Next is the main bearing, still in the case, the bigger circlip pliers I picked up yesterday were still 10-12mm too small to reach the two holes...
The next two are some brass shims from inside the clutch, the source of the bits I found in the case, and the spring cups, they have seen better days.
The clutch dismantling work area.
The next three is the rear brake actuating arm, I have never seen grease in this condition before, hard to describe but none the less a good clean is in order. The little bolt on the pivot arm part has been bashed to spread it and ground down in such a way that it can't be taken apart, the upside is it won't come undone and cause brake failure at 90kmph.
Lastly all the bits having a petrol bath, all except the clutch corks that is.
So all I need to get out now is the main bearing and give the lot a damn good clean and begin the rebuilding process. My flyside case should arrive by this time next week, by the look of the photo, it will need to be media blasted back to its former glory.

Tuesday, February 14, 2012

Piece by piece II


So another evening of oily hands and pulling stuff apart.
I didn't really find anything that looked really bad, the surface rust and ground rivets on the large drive pinion being the most obvious, the mainshaft where the gear pinions sit has seen better days but is still OK, my issue with it is the end where the pin goes through the castellated nut has been subjected to many a belting over the years and is still usable, but I think I'll put a new one in. The cruciform is in good condition, as are the gears and the selector spindle is a newer one piece one, not a three part one with a locking washer. I did find part of a brass shim in the case and there was a section inside one of the case cavities that was caked with grit, The wheel bearing is in good condition, but the seal was hard and will need to be replaced, looking through the Haynes manual, the photos show a castellated bearing retainer and a wire clip, I just had a circlip and the seal pictured above? WTF! there's a photo of it in the last post still in position.
The layshaft is OK, its a little worn where the kickstart gear engages, the needle bearings are in good condition as well. It all came apart fairly easily with some help from a rubber mallet of course, I couldn't get the main bearing out as my circlip pliers weren't big enough, trip to the hardware store today will fix that.
That's about as far as I went, last night, it was Valentines day after all, better spend some time with the trouble and strife.

Monday, February 13, 2012

Piece by piece


I started pulling the engine apart and as I did I took a few photos, I thank my four year old for deleting them off the camera when he was playing with it over the weekend.
I took some more of the disassembled bits.
Firstly I had to pry and scrape out the dirt from the end of the hole that the bolt that fixes the exhaust on, it was solid indeed, I also gave the swing arm cavity a good clean out as well.
On to the engine, the clutch nut didn't have a lock washer on it, they had, however, torqued it to within an inch of its life, the only way to get it off was with a impact wrench. The crank came out with about three or four decent blows with a rubber mallet and that's pretty much as far as I went with it. I am reading up on dismantling and making a list of parts I will need to replace, so far a new crankshaft, seals, bearings and hardware. Over the next week or so I should have the whole lot out and then as the cash flow allows, I will start collecting the parts I need to replace or can't re-use and begin rebuilding, bit by bit.
I'm not going to go through the photos, most of you know what you are looking at. Cheers.

Thursday, February 9, 2012

Taking a stand.


I have half bodged up a stand for the engine, needs some stabilising but does the trick, I pulled the clutch cover off and as I have had it off before there wasn't any surprises, there are dings and scratches, I'll tidy it up and still use it as it is still doing what it is supposed to, the clutch is still working quite well, but once I get it off I will have a closer look at it and if it looks like the corks need replacing or something else is obviously worn then it will be replaced too.
When I dropped the engine a decent handful of dirt fell out of the swing arm cavity, I haven't been on any dirt, save approx. 200-300 metres, so only god knows how long it has been in there...I'm guessing 35 or so years.
It was getting late so I called it a night.

Monday, February 6, 2012

Got me thinking....

I found out what went AWOL riding home, the bolt that holds the exhaust to the swing arm, this would also explain some of the rattling as well, On the last stretch up the hill from town to the driveway I touched on 80 again, speedo not actual, and I got a new type of vibration that I hadn't felt before, so I backed off and just cruised on home.
After I parked I began to think about the main bearing comments again and then sat down with a post ride ale and had a flick through the Haynes manual, suddenly it dawned on me. looking at all the exploded views the main bearings were quite obvious, then I got a slight sinking feeling, I didn't remember seeing a roller bearing, but I did see a caged needle bearing? I was focusing on the kickstart set up and getting that right.
I had a short discussion with the good wife and decided rather than stuffing up all the things I'd done, including the new kit, I'd at minimum split the cases and see what I had.
I was surprised at how efficiently I had the engine apart and the cases split, that bolt down the bottom got me again though....
And the winner is.


A needle bearing as a main bearing!!, I couldn't even begin to guess which model even had these to start with.
What to do? well I guess I had two or three choices, try and find a Veloce flyside case, or a sprint one and do some porting and welding work to get to match the three port cylinder, or a new set of engine cases all together.
A quick call to Vespa Wizard in Melbourne confirmed what I had already been told, rare as rocking horse poo, he did have a PX150 set that had been ported to fit a polini kit $300, bit more than I could afford, given the amount I had recently spent on the kit, but good to know that if I was stuck it was there.
I did the usual forum trawling and contacted my friend Porter G in the US to see if he knew of anyone that might have one, 5 minutes later I had a link to a guy that had just put one up for sale, a bit of email tennis and a day later and I have a Sprint V fly side case on it's way from the US at $76 AUD including shipping, happy with that.
I have decided to drop the engine and replace all the bearings and seals and have a general look see at everything else. The case could well take a few weeks so I'm in no rush, Time to get this scoot up to scratch once and for all.
First project- an engine stand.

Saturday, February 4, 2012

Second Hit Out

A busy week has past since the last ride I did kick it over during the week, once for five minutes, but have decided I want to get it reliable before I start riding it to work, last thing I want is to be out on the footpath trying to kick it over at 530pm...suppose I could just leave it there inside, anyway.
The conditions were the same, sunny and a warm 30 degrees C, She went on the second kick and off I went, it went well I ended up doing 70kms around town and other than some sloppy gear changes, most likely me, it went well, through the gears up and down, at one point I was up to 80 on the clock and wasn't even at 1/2 throttle, I didn't push my luck though, as it was shaking, vibrating badly, there was a rattle that I just couldn't pin point. I took her up some long slow hills and lots of long, 2-3km long straight flat roads speeding up to about 70 kmph and slowing down to vary the revs. I stalled out twice, the first time I pushed across the intersection, bear in mind this is in a smallish country town not inner city Melbourne, checked the plug, kicked it a few times with the plug out to make sure I hadn't flooded it trying to start it, just gave the idle screw a slight 1/8 turn and back together started on the third kick, I reminded myself to find some shade next time or at least take the jacket off. The second time I did find some shade and went through the same things after I tried 6-7 kicks, this time I pulled the idle jet to check it wasn't blocked, I noticed on the inside top of the air filter quite a few small black bits of something, not sure where they would be from, the fuel tank is in good condition, it is a new tap with a fine gauze filter on it, the fuel hose is new and a proper reinforced fuel hose not a standard clear rubber Vespa hose. One source could be the springs under the seat upholstery, they have been painted and the more use they get the more the paint comes off in flecks, I always have to wipe a few off the top of the tank when I fuel, some of these may have ended up in there.
When I was checking the jet a man in his 80s walked by, he stopped and mumbled a few things, some I did understand, some not.
"I remember them from after the second world war, something, mumble, something France"
" No, They were made in Italy, Vespa"
"Oh I've heard of them, you know a bit about them then?"
" A little, you need to because they break down occasionally"
" That happens to everyone though"
" Yeah but you can generally get these going again"
"Good luck" and he wandered off
I got it going and decided it was getting too hot to do this a third time and I made a B line for home on the way something fell off or I ran over something that I didn't see.....beginning to think about a comment K made about the bearings.
Total 100kms into run in.