Wednesday, December 22, 2010

Screw art


Here are the three screws that held the stator plate in, I replaced them and the washers with new ones. I threw them in the bin right after I took this awesome arty farty photo of them.
I got my socket adapter for my torque wrench and put the whole thing back together. wheeled it out into the sunshine and kicked her over, a nice smooth idle ensued and I threw on my helmet and went for a ride around the block a couple of times, the engine felt MUCH better, more responsive and the power had improved too, So I smiled and patted myself on the back as I parked up, an office lunch meant that it wasn't a good idea to ride very far, so I tidied up the workbench and put everything away and back into the glove box ready for a bit of a ride tomorrow after I get the day before Christmas chores done, mow the lawn, get any last minute supplies, The boys are in daycare so I will be left to my own devices.....
This blog has ticked over the 1000 hits mark with people from every continent having a look, over half are from Australia, a quarter from the US and the UK making up the best part of whats left, the rest are from everywhere Chile, Slovenia, Pakistan, South Africa, Scandinavia, all over SE Asia and Europe, Canada.
I have received Private offers of help and some very useful advice from people...Thank you to those guys for your time and interest to help out a novice scooter mechanic and budding enthusiast. I enjoy learning about the workings of the scooter and love riding it even more, I am now much more aware of what I need to keep an eye on while still enjoying the freedom and the joy of owning a classic scooter, even if it is of dubious origin.
I will be quiet for a couple of weeks, Christmas and holidays interstate you know the deal, the bike will be parked up for most of that time. Merry Christmas and a safe and happy new year.

State of the Stator Plate


Now I dont really know what all this is supposed to look like, but it isn't new, and some of the soldering was a bit sloppy, one dob had fallen off and was sitting in the bottom of the casing. I marked on the casing and the edge of the stator plate and casing how far I needed to move it, the three holding screws were worn from a lot of use, they all had washers and spring washers, I moved the plate to where it should be, cleaned it out and after cleaning up the key, shaft and flywheel put them all back together, this is when I realise that the torque wrench doesn't fit any of my sockets, so I'll go to the hardware store AGAIN and get the adapter. This afternoon after work I will put it all back together and give it a kick and see how it goes.

Flywheel off


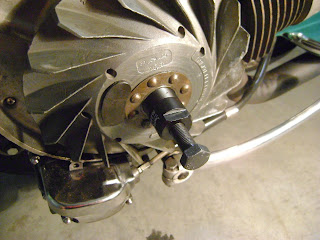
I use my new impact wrench to get the flywheel nut off, easy peasy. You can see the condition of it and the lock washer.
I give the flywheel threads a clean and screw in the removal tool, it goes in nicely a good 5-6 turns. I then hold it and turn it and the flywheel comes off a lot easier than I thought it would, and it was a lot heavier than I thought it would be, it was in reasonable condition, not perfect by any means but it looked alright to me.
The woodruff key was a little worn with a small line on both sides.
All the pics are pretty straight forward.

Compression & timing.


I was told there was three main possible reasons I was losing power and also having a sooty plug, compression, timing & points gap.
I confirmed the gap was within spec. I established TDC and 22 degrees and found the firing point was about 3-4mm out, so next was to make sure my compression was good.
It seems I have given either the hardware store and auto parts stores a visit each day this week....timing light, impact wrench, compression gauge, socket fitting for impact wrench, different spark plugs.......
So I hook up the gauge and give it 4 kicks to get it to 120psi, which is what is recommended, now I think I have to do it on a warm engine too, but that will have to wait because I need another ferking socket fitting for my torque wrench to get the flywheel back on. More on the flywheel later.
Pic. one. 120psi four kicks on a cold engine.
Pic. two. the gauge hooked up.
Pic. Three. My markings for the timing, when I did it the first time I used a felt tip pen, not a scribe, so I re-did it, there is a scribe mark down on the inside of the flywheel that you cant see in this photo.
Pic. four. I need a bigger bench.

Sunday, December 19, 2010

Front end surprise


Because of the weather I was unable to go riding, I did manage a few short runs after I set the cab, some good, some short and spluttery, I ended up resetting it all twice as I must have had something wrong because I got to the point where the run was just backfiring, sputtering and dying, not at all good. I still have the lake of higher speed power and acceleration after 80kms per hour (approx. 50mph)which i'm told is a classic symptom of timing, I had a chat with a local sparky about the little light circuit shown in the points timing section of Scooterhelp.com and he seemed to think I didn't need the battery holder but sold me the clips, some wire and a light. needless to say I couldn't get the circuit working, well it worked but it didnt cut out when the points seperated like it should, no matter where I clipped them, so I will be going back to see him today. To the naked eye the points open at around the right spot, but I need to be sure. I can't get my hands on a timing light without ordering and waiting, and this close to Christmas it could take weeks.
Anyway I was just having a really good look over the whole bike, at the welded ptsches mainly and everywhere else I could get to without pulling too much apart, I noticed the two grease nipples on the front suspension arms were painted over, I scraped the paint away to check if the nipples were still working, i.e. that the little retaining ball still moved in and sprung out, they did, but I thought I'd just change them, What I found in the first one was a little disturbing, the grease was thick, and I mean hard to spread thick, BUT it was riddled with tiny shards of what looked like brass, now I have no idea what it could be that was in there nor how it ended up in pieces...fark sake.
The other one, the higher up one was fine, fresh grease and all, I replaced both nipples and new grease. I pulled the shiny cover off the arm and had a look in there it all looked ok, I did notice also that the front shock lower rubber looked like it was worn and in need of replacing, but the whole connection looked out of square to me, see bottom photo, It may be that this is how it sits, I don't know.
Pic. one. Grease with the brass shards through it, and the old nipples.
Pic. two. New nipples in place
Pic. three. Inside the arm cover.
Pic. four. Top view of the lower shock connection, does this look like it should???
I rode the GT into work today, weather mainly but I want to take the Sprint for a good run without having to be somewhere on time, just in case. She has 1600 kms on the clock.

good, bad, ugly, not in that order.

With interest from a few quarters, positive and negative, and an experienced eye or two, a week can change everything.
I bought a scoot from Vietnam, I knew the history, the horror stories. I took a gamble and as they say "buyer beware". I now have a scooter that I absolutley love riding, she goes ok, no problems, not big ones at this stage.
Every little twist and turn opens up a new WTF.
From good advice, I sort of waded into the deep end and  attempted to start from scratch. I re-set the carb, established the TDC (top dead centre) of the piston, checked the points gap and half arsed checked the timing, more on that later.


Pic one. The carby, a new, I think, Spaco dellorto 20/20. we are still getting to know each other.
Pic two. a down loaded timing disk in place, a wire marker, probably not so clear, but essential in the process.
Pic three. My badly constructed TDC tool, and disk. I took the busted bum spark plug that came with the scoot and twisted and broke the spark gap thingy off, smashed the ceramic insulation bit off with a hammer and pulled out the electrode, this was all with guidance from a well known scooter website, I then bastardised it with a blue plastic plug, super glue and a long screw. Not pretty but functional.
All said and done, the TDC and the spark timing, was, from a naked eye point of view, close. I will need to either employ the local bike shop or bluff my way through the whole timing light thing
I checked the points gap and was happy, the tolerance should be .3-.5mm, It was over .3 but the.38  just squeezed through, so I think thats ok.
I enjoyed doing this,  I love the "what is the next twist and turn going to present" factor,I'm aware of the possibles, and will deal with them as they present themselves.

Welds of concern


The welds that were blurred out of the original photos, fairly obvious, which is why they were probably blurred out in the first place... No comment really.